Loading and Browsing Data
The text below is a transcript of the video above, edited with AI assistance for clarity and flow. Where the two differ, the video is the authoritative version.
You’ll learn to
In this video, we look at a dataset: we browse it after having set the working directory in Stata. You will learn to:
- Load a dataset in Stata.
- Browse a dataset by switching between Stata and the codebook.
Step 1: Download the materials
We use the Brexit replication dataset: a regional-level dataset on the Brexit vote and several other socioeconomic variables for different regions of the UK. It is available in the Shared Project Folder.
- The dataset is
Brexit_Regional.dta, in thedata-rawfolder. Select it, click download, and save it into thedata-rawfolder on your own computer. - The
data-rawfolder also holds the British Election Study dataset, and the codebooks for both the Brexit data and the British Election Study. They are available for download too.
The shared folder is the folder I use when I do the analysis locally on my computer. Set up a folder structure on your computer that mirrors it: a top-level folder for your own analysis and, within it, the subfolders data-clean, data-raw, do and output.
Step 2: Set the working directory
Once the dataset is saved, you can set the working directory. We have been through this in an earlier video in this series, The Stata Interface. You can either click File > Change working directory or, if you have saved a do-file (set-wd.do) as instructed in The Stata Interface, you can copy the command from there.
If you are doing this some time after that video, say a day later, you can still click the New Do-file Editor icon and open the do-file that sets the working directory: go to your project folder, click on do, and open set-wd.do. That do-file has the one command that sets the working directory, the command that tells Stata: this is where my project lives, this is where all the files we are going to be working with are stored.
Step 3: Open a new do-file
Click on the “New Do-file Editor” icon, a sheet of paper and a pencil.
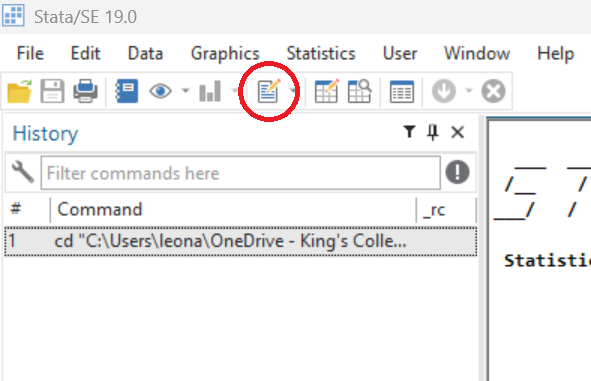
We are going to create a new do-file whose top line is still the same as in set-wd.do.
Step 4: Set up your do-file to load the dataset
The first line should be the command that sets the working directory. It should look like:
cd "[Path\To\Your\Folder]"- If you use a Mac, there will be forward slashes instead of back slashes.
Right below that, enter:
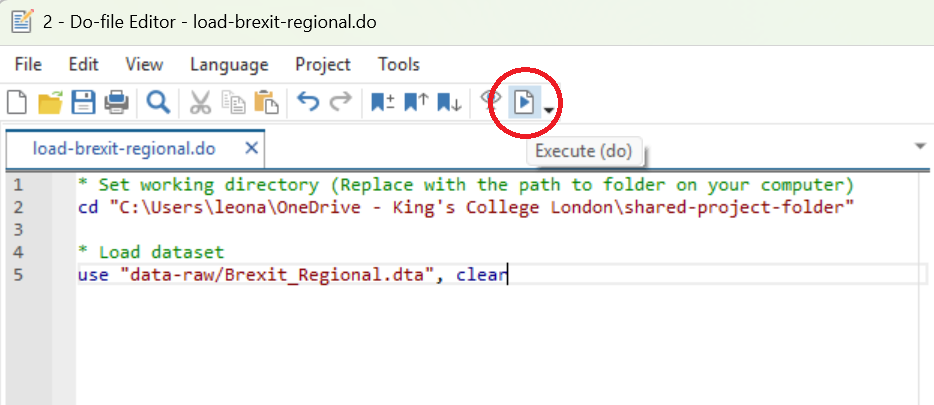
use "data-raw/Brexit_Regional.dta", clear
This is the command that tells Stata to use the file Brexit_Regional.dta. Between the quotes, we are telling Stata: within the working directory, go into the data-raw subfolder, and in that subfolder you will find this dataset, the Brexit regional dataset. So the first line tells Stata where all of the files are, and the second tells it that within that folder there is a folder called data-raw, where it will find the file to use.
The , clear matters when another dataset is already loaded in Stata: without clear, there would be an error. That is not the case here, but it is good practice to add it whenever you tell Stata to load a dataset with the use command.
I also add comments. To add a comment, you start the line with an asterisk, and the text turns green. Above the first command I write “Set working directory” and above the second “Load dataset”. These comments help us remember what we are doing: next time you open the do-file, you know what task each command is performing.
* Set working directory
cd "C:\Users\leona\OneDrive - King's College London\methods-education\shared-project-folder"

* Load dataset
use "data-raw/Brexit_Regional.dta", clear
Replace the path in cd with the location of the project folder on your own computer. The text will not be the same as the one you see here: it will be the address of your project folder on your computer, so it will look different.
Step 5: Run the do-file
The next task is to execute the do-file. Once you have the path to the folder on your computer and the command that tells Stata to load the dataset, find the icon of a white sheet of paper with a blue “Play” button and click it. This will execute all commands in the do-file: Stata sets the working directory and then pulls the dataset from that folder.
In the screenshot, the lines of green text after the asterisks are comments. Stata won’t run them.
Step 6: Check if it has worked and save your do-file
If you see this list on the top-right pane of your Stata screen, it has worked!
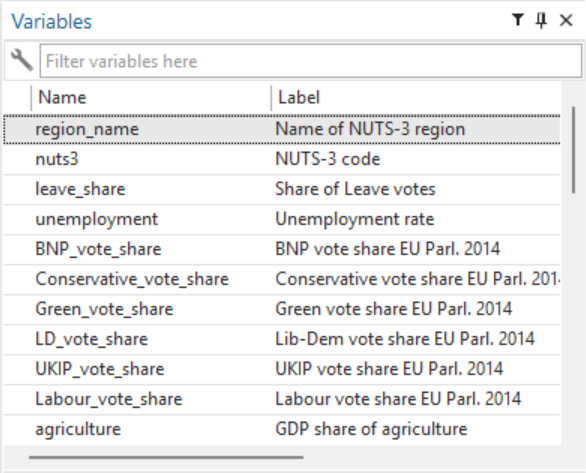
You have the different variables there: the region name, the share of Leave votes, the unemployment rate, and so on.
Be sure to save your do-file in your do folder. I already have a do-file there called load-brexit-regional.do; you can come up with a name like that for yours.
Step 7: Browse the data
Now that you have done that, you can start browsing and exploring the data. Click on the icon with the magnifying glass.
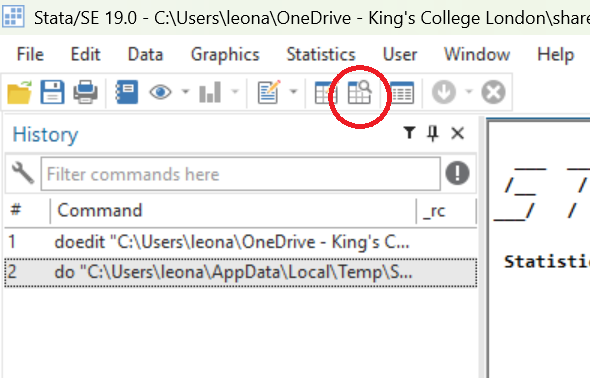
Once you do that, a new window comes up showing the entire Brexit dataset. You can see the regions. Take Manchester: 39% of the people in the region of Manchester voted Leave in the Brexit referendum, and the unemployment rate is 8.2%.
The exercise I am proposing is simply that you look at this dataset while switching between your Stata screen and the codebook. For example, open the codebook and find a variable, say the immigrant share: the share of foreign-born residents out of the total population in 2016. Then go back to the data and find it. Take care to pick the right column: immigrant arrivals is a different variable from the immigrant share. Looking at the immigrant share, we see 3.52: 3.52% of the people in Hartlepool and Stockton-on-Tees in 2016 were immigrants.
This is basically what I advise you to do, because it is the very first step towards getting acquainted with what a dataset looks like and what a codebook looks like. If you get there, you are set up for the analysis that we are going to do using Stata.
Recap
- By setting the working directory, we tell Stata where our project lives.
- Once that is done, we can load datasets by showing Stata where to find them in the subfolders inside our working directory.
- Once a dataset is loaded, we can browse it using Stata, and then we will be able to start analysing the data and generating tables and charts.
Why this matters
This exercise allows you to familiarise yourself with what a dataset looks like in Stata. It also gets you used to the habit of going back and forth between a codebook and your data: you are always switching between the codebook and the software that you are using to analyse your data.