The Stata Interface
The text below is a transcript of the video above, edited with AI assistance for clarity and flow. Where the two differ, the video is the authoritative version.
You’ll learn to
Setting the working directory and creating your first do-file are tasks that will help you familiarise yourself with the Stata interface. They are also the first steps towards learning how to work with Stata. In this video you will learn to:
- Identify the different panes in Stata.
- Set the working directory in Stata.
- Create and save a do-file.
Step 1: Set up the folder structure
If you have not yet set up the folder structure on your computer, with a folder for the data analysis that you are going to be doing, please do so now. You can create the folders manually on your computer. Once the folder structure is set up, you will be able to set the working directory and start working with Stata.
This is the recommended folder structure:
my-research-project/data-rawdata-cleandooutput
You have a top-level folder, which here has the generic name my-research-project. In this video I use a folder with a different name but the same structure. You can give the top-level folder whatever name you want, but I recommend naming the subfolders exactly like this:
data-raw- Original data files, never edited.
data-clean- Cleaned or transformed datasets.
do- All Stata do-files.
output- Tables and figures.
You will see what a do-file looks like soon.
Step 2: Open Stata and set the working directory
Once that is done, you can open Stata and set the working directory.
With Stata open, you have several different windows, or panes. At the bottom is the Command pane, where you can type commands for Stata to execute. We will be avoiding this, because we prioritise having the commands in a do-file: you will be executing commands from the do-file, and it will become clear pretty soon why this is important. At the top is the output pane, where the results of the analysis show up. On the left-hand side is the Command History pane, which you will see at work shortly. On the right-hand side are the Variables and Properties panes, which become active once we load a dataset.
The working directory is where your project lives. It is the folder that you created for the data analysis you will be doing. Every file in a computer lives in a folder, and when you set the working directory you are giving Stata the address of that folder.
In Stata, go to File > Change working directory and select the top-level folder you created for your project. The folder I created for this video series is called shared-project-folder, and it is in my OneDrive. Notice that below this folder there are subfolders called data-clean, data-raw, do and output, but I select the top-level folder itself, shared-project-folder, and then click OK.
After that, you should see a command appear in Stata that says cd, followed by the path: the local address on your computer that leads to this folder.
Step 3: Copy from the Command History pane
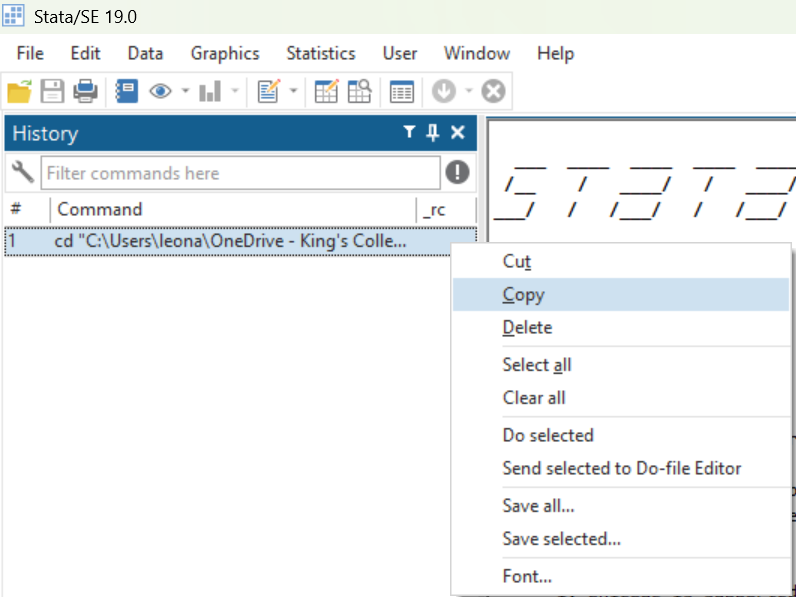
After you set the working directory, Stata registers this action as a command in the Command History pane, on the left-hand side. By pointing and clicking, we get Stata to also generate a command. Right-click that first command in the Command History pane and click “Copy”.
Step 4: Open a new do-file
Once you have set the working directory and copied the command, open a new do-file. The do-file keeps a record of everything you do in Stata.
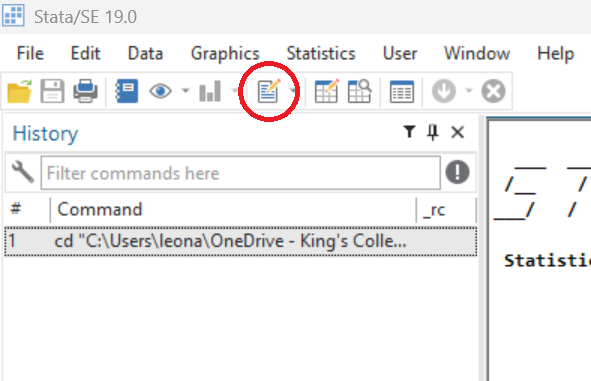
The red circle shows where the New Do-file Editor icon is in Stata: a sheet of paper with a pencil on top. Click it and a new do-file will pop up.
Working with Stata involves having these two windows open: the main Stata window itself and the do-file. We are going to be running the Stata commands from the do-file.
Step 5: Paste the command into your do-file
In the do-file editor, paste the command you copied from the Command History pane.
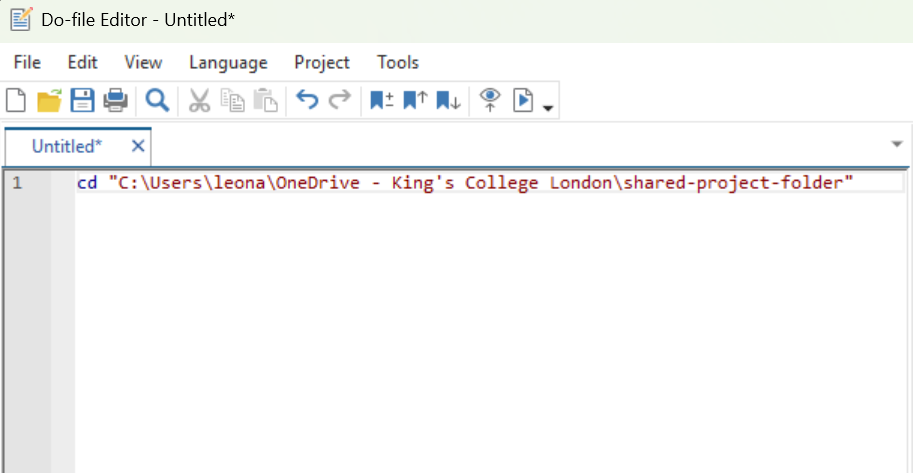
You now have cd followed by the address of the folder holding the files for your data analysis. This is how you direct Stata to the folder where the project lives on your own computer. Later on, we will be using the command in this do-file to set the working directory.
Step 6: Save your do-file
Now, from the do-file editor, save your do-file in your do folder. I recommend naming it set-wd.do. This file will be helpful later on, so keep it in your do folder.
When I save mine, I find the top-level folder, shared-project-folder, and then the do folder inside it. I recommend that you also have a do folder. You can see that mine already has a couple of do-files in it. You do not need to have those at this stage, but you will be creating do-files like them pretty soon. Then I click Save on this do-file, which only sets the working directory.
For now, nothing has happened in terms of data analysis, but this is a very important step towards learning how to work with Stata.
Recap
- The working directory is the folder on your computer where your project lives.
- Keeping a do-file with a command that sets the working directory will be helpful for future tasks.
Why this matters
To open a dataset, we must point Stata to the folder where it is located, and setting the working directory makes replicability easier. Now that you have done that, you will soon be ready to load a dataset and start browsing and looking at it in Stata.